

Hydration bladder motorcycle setups are a game-changer for adventure riders facing hot, arid, or desert rides. If you want to ride longer, stay safer, and stop less, switching from water bottles to an advanced hydration bladder motorcycle system is essential. Here’s how to choose, set up, and master this proven gear for hardcore adventure travel.
Key Takeaways
- Tank-mounted and hands-free helmet-compatible hydration bladders keep water cold and accessible on the move, critical for desert and multi-hour adventure rides.
- Top systems like the ThirstyRock TRH 3.2 Pack and USWE Moto Hydro 12L balance capacity, ruggedness, and on-bike comfort.
- Proper setup and expert hydration strategies will prevent fatigue, minimize stops, and keep riders safe in extreme heat.
Table of Contents
Why Hydration is Critical for Desert Motorcycle Rides
Desert motorcycle riding creates hydration demands that basic water bottles cannot handle. High temperatures, low humidity, and relentless sun can quickly lead to dehydration and heat exhaustion—a risk that increases the longer you ride.
Unlike casual road trips, adventure and dual-sport riding in arid climates means you’re constantly sweating, even if you don’t feel it. Dehydration can sap your focus, slow your reflexes, and make you more vulnerable to mistakes. Traditional bottles force you to stop, remove your helmet, and often drink warm water that’s bounced around in your luggage.
Specialized hydration bladder motorcycle systems directly address these issues. As one industry report notes, “A tank-mounted hydration bag with an insulated reservoir and helmet tube can keep water cold for hours in extreme heat, addressing the unique needs of desert riders.”[3] With a hands-free system, you hydrate as you ride—and stay mentally and physically sharp hour after hour.
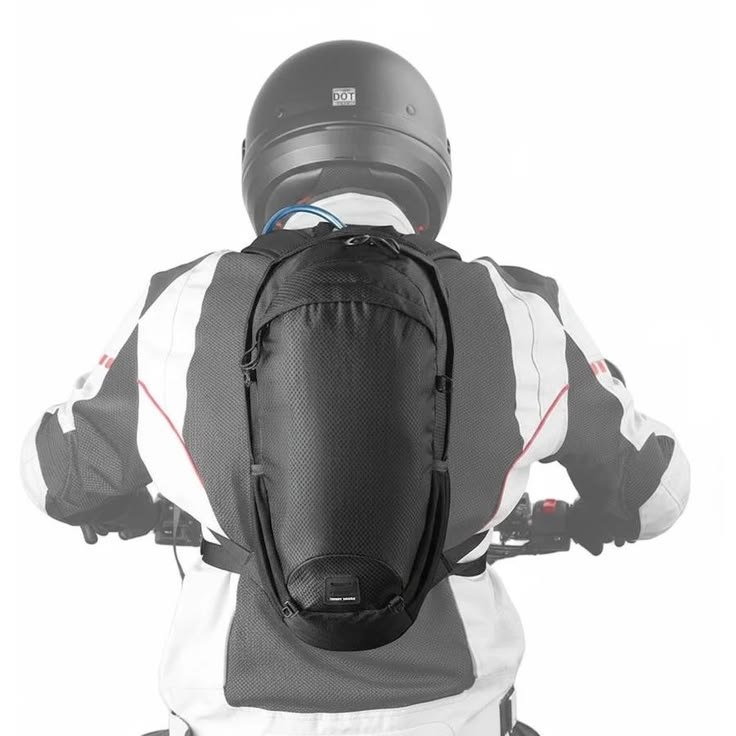
How to Set Up a Hands-Free Motorcycle Drink System
Setting up a motorcycle drink system with a helmet-mounted tube isn’t complicated, but small details make a big difference for comfort and usability on the trail.
Choose Your System:- tank-mounted hydration system: Best for keeping weight off your back and accessing cold water quickly. Examples: ThirstyRock TRH 3.2 Pack, Nelson Rigg CL-HYDRO Hydration Kit.
- Backpack hydration pack: Offers more capacity, but can get hot and heavy on long rides. Examples: USWE Moto Hydro 12L, Klim Nac Pak 3L.
For desert rides, tank-mounted or insulated packs are your best bet for keeping water cool.
- Mount and Secure:
- Follow the manufacturer’s instructions for strap or magnetic tank-mount installation. Make sure nothing interferes with your controls or standing position.
- If you use a backpack, adjust the harness to prevent shifting and chafing.
- Route the Hose:
- Run the insulated hose along the bars or tank (tank-mounted), or along your shoulder strap (backpack).
- Attach with Velcro, zip ties, or dedicated hose clips so it won’t tangle or snag while riding off-road.
- Install the Helmet Drink Tube:
- Use a quick-release connector (found in USWE MX Helmet Handsfree Kit or ThirstyRock) for easy helmet swaps or off-bike use.
- Mount the bite valve near your mouth using an adhesive Velcro or a magnetic keeper to keep it in the sweet spot—no need to look down or grab a swinging hose in rough terrain.
- Test and Adjust:
- Put on your gear and helmet. Sit on the bike and simulate reaching for the hose or drinking while in motion.
- If your helmet rubs or the hose is too short, re-route. Better to tweak now than on a rocky trail.
- Keep Water Cold:
- Fill with ice, use both internal insulation and an insulated outer bag or sleeve.
- Maintenance and Refills:
- Only use food-grade, BPA-free bladders like those in the leading systems (USWE Moto Hydro; ThirstyRock).
- Clean after every big ride to avoid mold. Use a proper cleaning kit and let the bladder dry fully before storage. For easy mid-ride refills, choose a tank or system with a wide cap or quick-fill port.

For more guidance on practical adventure gear, check our adventure motorcycle camping gear guide.
Advanced Analysis & Common Pitfalls
Even the best hydration bladder motorcycle system can fail if set up poorly or if you don’t anticipate the unique challenges of riding hot, remote terrain. Here’s a breakdown of the leading systems, their key features, and what might trip you up on an actual ride.
| System | Capacity | Mounting | Insulation | Hands-Free? | Ideal Use Case |
|---|---|---|---|---|---|
| ThirstyRock TRH 3.2 | 2–3 L | Tank-mounted (straps/magnetic) | Insulated bladder & hose | Yes (helmet kit included) | Short to mid-range desert/adventure rides where space is limited |
| USWE Moto Hydro 12L | 12 L | Backpack or tail-mounted | Full pack & tube insulation | Yes (hands-free helmet kit) | Long multi-day or unsupported desert traverses; extreme heat |
| Giant Loop Cactus Canteen | 2–6 L | Flexible/soft luggage insert or tank bag | Optional insulation | Optional via aftermarket kits | Supplemental water for backup or ultralight setup |
Common Pitfalls:
- Warm Water Too Fast: Even insulated systems lose some chill. Fill with partial ice, keep bags out of direct sun, and insulate all hose sections.
- Leaks or Mold Growth: Don’t skip regular cleaning and hose drying. Check for pinhole leaks or loose connections before every trip.
- Hard-to-Use Bite Valves: Some valves leak, others require more sucking effort. Upgrade to rugged, replaceable bite valves as found in packs like USWE Moto Hydro 12L or Kriega.
- Overloading Your Tank or Back: More water means more weight. For short rides, don’t bring extra just because you can; for long rides, distribute water across tank and backpack to balance the bike.
- Poor Hose Management: A dangling hose can be a distraction or safety risk. Secure it with a magnetic or Velcro keeper every time you gear up.
For extra protection and comfort when temperatures drop at night, see our review of the heated vest for cold-weather rides.
Want more sage planning ideas for adventure rides? See our comprehensive motorcycle tour packing list and touring prep guide.
Conclusion
For real adventure and dual-sport riders, a modern hydration bladder motorcycle system—tank-mounted or hands-free helmet-compatible—offers the safest, smartest way to ride longer in hot climates without losing performance. Choose the right capacity, keep your fluids ice-cold and accessible, and never let dehydration cut your ride short. Take the next step: upgrade your hydration system before your next desert crossing or multi-day tour.
Ready for more tips? Explore our best hydration pack for motorcycle riding guide and stay prepared for anything the desert throws at you.
FAQ
What is the best hydration bladder motorcycle setup for desert riding?
For most riders, a tank-mounted system (like the ThirstyRock TRH 3.2 Pack) offers the best mix of insulation, hands-free hydration, and low center of gravity. For longer expeditions, a high-capacity backpack system such as the USWE Moto Hydro 12L—paired with a hands-free helmet tube—is ideal.
How do I keep water cold for a full day ride?
Fill your bladder with ice before topping up with cold water. Use insulated reservoirs and hoses. Store the hydration pack out of direct sunlight, and add a neoprene sleeve over the drink tube for extra cooling effect.
Are hands-free helmet hydration systems safe?
Yes, when set up properly. Hands-free helmet drink tubes allow you to hydrate without taking your hands off the bars or your eyes off the road, reducing the risk of distraction or accidents. Always secure the hose and test operation before rides.
How do I clean a hydration bladder motorcycle system?
Rinse immediately after use, then use a cleaning kit with mild soap. Hang all parts to fully dry. For extra safety, occasionally sanitize with specialty cleaning tablets. Clean thoroughly after any ride involving electrolyte powder.
Should I use electrolyte powder for motorcycle touring?
Absolutely. Long rides in heat rapidly deplete salts and minerals. Single-serve electrolyte powder packets are easy to stow and can be mixed in seconds—critical for maintaining stamina on desert or mountain expeditions.